
Author: Randeep Singh / go to all Techniques of Yoga articles
Hala is the traditional plow
of the Indian farmer.
Settling your body into the form
of Hala is known as Halasana.
Majority of the Yoga asanas are
supposed to be derived,
from various natural and animal forms.
That means turning the human body
into these nearly animal shapes,
and forms render physiological and psychological benefits on it. Animals have existed throughout along with the human race, so they were observed by then existing virile minds and the benefits of getting human bodies close to their forms and shaped were deciphered. How come the same humans invented the plow much later when they started to settle down in an agrarian life the shape of which would also be rewarding for the human body to attain. Hala or the plow is an artificial creation, or are all creations germinating from the human Mind, which is a product of nature itself, natural too? Halasana can yield more benefits if one knows what a yoga asana is and how should it be done, as per Patanjali.
Preparatory Postures for Halasana
The flexibility of the plantar flexors of the ankles and flexors of the vertebral column along with the neck extensors helps in getting into the final alignment of the Halasana. Though it is easy to get into this asana from Sarvangasana, certain asanas, mentioned below, if practiced regularly helps with preparing the required muscle sets for getting into Halasana.
- Pawan Mukta Asana: It opens the lower back easing out the flow of the lower back as required for this asana. It also releases the muscles of the cervical region along with the shoulders a prerequisite for getting into a properly aligned Halasana.
- Setu Bandh Asana: This posture prepares the shoulders and the neck by t strengthening them for taking the weight and stretch of the lower body bending over the head from the waist, along with acclimatizing the lungs for Clavicular breathing as is necessitated by Halasana.
- Ubhaya Padangushthasana ( Dronasana)
- : This asanas helps with increasing the contractibility of the abdominal muscles as otherwise, these muscles tend to fall loose in Halasana. Learning to contract them aids with experiencing a more integrated final posture.
- Ardha Halasana : Lying supine on the mat with both the legs raises at 90 degrees from the waist, palms on the mat beside the hips, just by the pull of the abdomen prepares the practitioner by making him experience the pressure in the abdomen and on the hamstrings ( Behind the thighs) as would be experienced in the final positioning of Halasana.
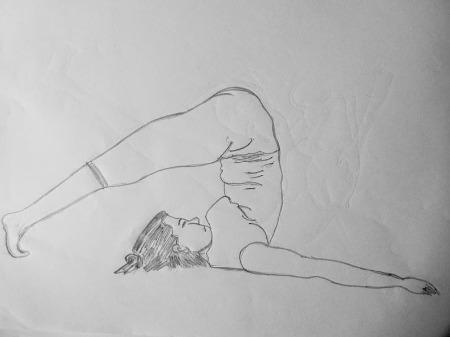
How to do Halasana
- Lie supine on the mat with both legs fully stretched out, hands beside the hips palms facing down
- Exhaling raise both the legs straight up to the vertical position ( 90 degrees from the upper body) using only the abdominal muscles
- Take some normal breaths, press the palms in the mat, start exhaling and lift the hips in the air with both the legs going over the head, as far as possible, toward the floor beyond the head
- Raise the palms from the mat and place them on the lower back and upper hips as support, lower the legs and touch the floor with the toes pointing inwards, this forms the plow shape of the Halasana
- Slide the toes farther away by slowly relaxing the lower and upper dorsal region till the knees become straight, press lock the chin in the chest – throat lock – so that the circulation is increased in the bent cervical region
- In the final position fo Halasana, the hands can either be placed back on the mat, palms facing down or with the fingers interlocked, this will open up the upper back, stay in this pose for as long as comfortable
- Gaze at your navel and do not turn the head in order to protect your neck, lift the kneecaps upwards to engage the muscles of the legs, try to lengthen the back of the neck as much as possible
- While coming out of Halasana the palms in the mat and lift the legs up, dropping the hips down in a flow ( not with jerky movements) vertebra by vertebra controlled by the abdominal muscles till the heels are placed back on to the mat as was in the starting position
- The head should not pop up while placing the feet back on the ground
Breathing Pattern – Duration And Repetition
In case of dynamic variation ( Breath coordinated rhythmically with every movement )
- Inhale 2 seconds while raising legs from the supine position to 90 degrees to the torso
- Exhale 2 seconds while taking the legs above the head and lowering them beyond to the floor
- Suspend the breath for 6 seconds while maintaining the pose thus
- Partially inhale for 2 seconds while returning to the starting position
Initially, start with only one round of Halasana, and work up to at least three rounds as one set over a period of few weeks
In case of Static variation
Stay in the final posture as long as possible and gradually increase it to 2 minutes maximum over a period of time.
During both the breathing variations of Halasana, the breathing should be from the nose and not the mouth.
Alignment Essentials and Modifications ( Halasana)
- In case intense stretch is felt behind the legs the toes can be turned in to release this tension, as there is a possibility that the toes swing up from the mat due to the intense tension felt in the back of the legs
- Do not stop breathing at any stage of Halasana, being aware of the breath will help relax the entire body and facilitate the movements for getting into the final posture
- The legs need to be kept straight throughout, avoid bending the legs at any stage
- In case the toes are not able to touch the mat, while the legs are hanging above the head lift one shoulder each at a time and place it back on the mat, this will ease the tension in the muscles behind the shoulders ( preventing the legs from lowering further, and will help place the toes on the mat faster
- Keep the legs together as much as possible while doing Halasana
Follow Up Poses for Plow Pose
In order to counteract the effects of Halasana practice Matsyasana, Ustarasana or Supt Vajrasana for half the time the Halasana was practiced. These asanas will bend the cervical spine backward counteracting the intense forward bend of the same in Halasana.
Common Faults Halasana
- Legs are apart
- Knees are bent
- Toes point away from the head
- Arms are far apart on the mat
- Back is not vertical, or hips are not directly above the shoulders
- Hands are not on the ground
- Legs are not directly above the head but pointing in a different direction
Contra-Indications – When not to do Plow Pose
- Persons suffering from a hernia (especially navel), Slipped disc, Sciatica, high blood pressure, arthritis of the neck or any critical neck pain like the one due to cervical spondylosis should not attempt Halasana
- Plow pose should also be avoided during the menses and last five months of pregnancy. in case the person is having prolapse of the uterus and hernia of the navel this pose must be practiced with the legs bend at the knees in order to relax the muscles to the minimum.
- If suffering from Kyphosis one should not try to force oneself too far into this pose.
- In case of asthma the person may feel tightness in the chest while holding Halasana in final position, thus in such cases, it should be held for shorter periods.
Advantages – Benefits of doing Halasana
Emotional:
- Halasana elevates the mood, and forms a part of mood elevator yoga
- Stimulates and calms the Mind simultaneously
- Reduces anger, irritability in case halasana is held at ease, halasana forms an important part of the yoga for managing anger
- Sucks out fatigue and lethargy
Psychic:
- Halasana works on Visudhi and Manipura Chakras ( energy Centres), The pressure on Visudhi chakra makes the voice sweeter
Physical:
- It helps treat constipation, indigestion ( tones the digestive system) and flatulence
- Its used in treating conditions like asthma , diabetes and urinogenital problems especially of females
- It can help to tone up the liver after jaundice
- Plough pose tones the legs, tone the hips along with the spinal nerves
- It strengthens immunity by working on the thymus gland and also accelerates base metabolism rate helping in reducing the extra weight
Halasana or Plough Pose impacts the nervous system, and reproductive systems positively. This asana extends the spine 15 percent more than normal, from the tip of the sacrum to the occiput, creating enough space between the vertebrae for relaxing the spinal nerves passing between them which may otherwise remain pressed due to misalignment of the posture in general.
This also relaxes the blood vessels taking the same route and flushes the related vital organs with the more nourished blood. The muscles of the spine on the posterior gets stretched improving their tone and pliancy. The pelvis receives the inverted pressure in this posture which drains the organs placed within improving their functionality further, because of which it is always included in the Yoga for the Pelvic health. The same inverted intraabdominal pressure strengthens the ligaments and muscles of the uterus and the ovaries too. It is used to strengthen the uterus under the class of asana known as yoga for a healthy uterus. Yoga therapists include halasana in their yoga practices for preventing appendicitis.
Drainage of the organs by inverting them helps with eliminating toxemia or toxic substance which remains trapped in their bases in their normal positions. Plow pose has been found effective in treating Hysteria and Neurasthenia. Halasana forms an important technique of yoga for Neurasthenia. it is universally recommended as a part of the yoga for handling hysteria. Other conditions where the Plough pose has proved to be God-sent are constipation, sexual debility, menstrual issues, enteroptosis, and spinal rigidity. Halasana is always included in the curriculum of yoga techniques for reversing enteroptosis.